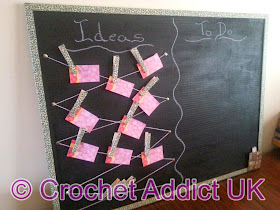
A place for you and your creative side.
Keep all your ideas and to do list in one place.
Materials
Plain Cork Board - available from Darice
FolkArt ® Chalkboard Multi-Surface Paint - Black, 8 oz - available from Plaid Online Store
Fabric
Glue
Washi Tape available from Darice
Hemp Twist Cord Metallic Stripe - available from Darice
Clothes Pins (pegs)
Drawing Pins
Chalk
Masking Tape - available from Darice
Paintbrush - available from Darice
Staple Gun or hot glue gun
Scissors - I use Fiskars Premier Non-Stick Titanium Softgrip Scissors as they are comfy to use, hard-wearing and perfect for most crafting jobs.
Take your plain cork board and mask off the edges.
Take the Chalk paint and paint it onto the cork board.
You need to leave the paint to dry for an hour and then add another coat.
You then need to leave it for 24 hours to fully dry.
During this time you can make your chalk pouch and washy tape pegs (clothes pins).
Decoration
If you would like to add that something extra you can put the same washi tape as the pegs on the surround of the chalkboard.
Chalk Holder
but you can make it to your own specifications.
If you want you can sew the hem on the holder or you can use the glue method.
To make it easier iron a hem around the holder. Once it keeps it's shape glue the hem down.
You now need to glue the sides down.
I placed a ruler in the chalk holder so the center didn't glue down as well. Leave the holder to dry.
Clothes Pins (Pegs)
Take your clothes pins (pegs) and your washi tape
Cut you washi tape slightly larger than the clothes pin (peg). Cut down the sides where it goes over the edge.
Fold the side over and then fold the end over. You clothes pins (pegs) are ready to go.
Marking off Chalkboard
 When the chalk paint is dry mark off half way across.
Then Mark off your board
Hanging Strings
 Knot the string around the first drawing pin. Once it is knotted a couple of times wrap some of the string around the pin and cut the rest off. Push the pin into the top of the row on the right.
 Pull the string across and pin at a lower level. Do this from one side to the other creating the pattern. To get the string to stay around the pin, wrap it around the pin and then push into the board. Once you have finished the one side do the same on the other side but opposite directions.
Your pegs now have somewhere to hang with your ideas and your to do list is ready to use.


No comments:
Post a Comment
I hope you enjoy the blog http://www.crochetaddictuk.com!
Thank you ever so much for commenting!
I love reading everything you put and I will try and reply but it just depends on my health.
Thanks Sue